Introduction: Why Proper Wine Cellar Cooling Installation Matters
A wine cellar is more than just a storage room—it's an environment meticulously designed to preserve and age your wine collection to perfection. One of the most critical aspects of any wine cellar is the cooling system. Proper installation is essential for maintaining ideal temperature and humidity, preventing spoilage, and ensuring your investment is protected for years to come.
For a comprehensive overview of selecting the right system, see our Wine Storage Cooling Systems Buying Guide.
In this guide, we’ll walk you through everything you need to know about wine cellar cooling installation requirements, from system selection to insulation, ventilation, and ongoing maintenance.

Understanding Wine Cellar Cooling Systems
Before you start the installation process, it’s important to understand the different types of wine cellar cooling systems available. The right system for your cellar will depend on factors like room size, location, and your specific storage needs.
Explore our complete selection of wine cellar cooling units to find the perfect fit for your space.
Types of Wine Cellar Cooling Units
-
Self-Contained (Through-the-Wall) Units:
- Easiest to install, similar to a window AC unit.
- Requires a vented adjacent room for exhaust heat.
- Best for small cellars and DIY installations.
-
Interested in this style? Browse our through-the-wall wine cellar cooling units for popular options.
-
For a deeper dive into system comparisons, read Self-Contained vs Split Wine Cooling Systems.
-
Ducted Cooling Systems:
- Cooled air is delivered via ducts from a remote unit.
- Allows for flexible placement and quieter operation.
- Requires professional installation.
-
Discover our ducted split wine cellar cooling units for flexible and quiet installations.
-
For a system-specific comparison, see Through-the-Wall vs Ducted Wine Cooling.
-
Ductless Split Systems:
- Evaporator is installed in the cellar, condenser is located outside or in a remote room.
- Minimizes noise and heat inside the cellar.
- Professional installation is necessary.
-
View our ductless split wine cellar cooling units for advanced solutions with minimal noise.
-
For installation tips, check How to Build a Wine Cellar.
-
Fully Ducted Split Systems:
- Both evaporator and condenser are located outside the cellar, connected via ducts.
- Offers maximum flexibility and minimal noise.
-
Find specialized solutions in our self-contained & ducted wine cellar cooling units collection.
Choosing the right system depends on your cellar’s location, available space, noise concerns, and budget. For help sizing your unit, visit What Size Wine Cellar Cooling Unit Do I Need? and Best Wine Cellar Cooling Units by Cellar Type.
Pre-Installation Cellar Preparation

Proper cellar preparation is the foundation of a reliable wine storage environment. Without it, even the best cooling system may struggle to maintain consistent conditions.
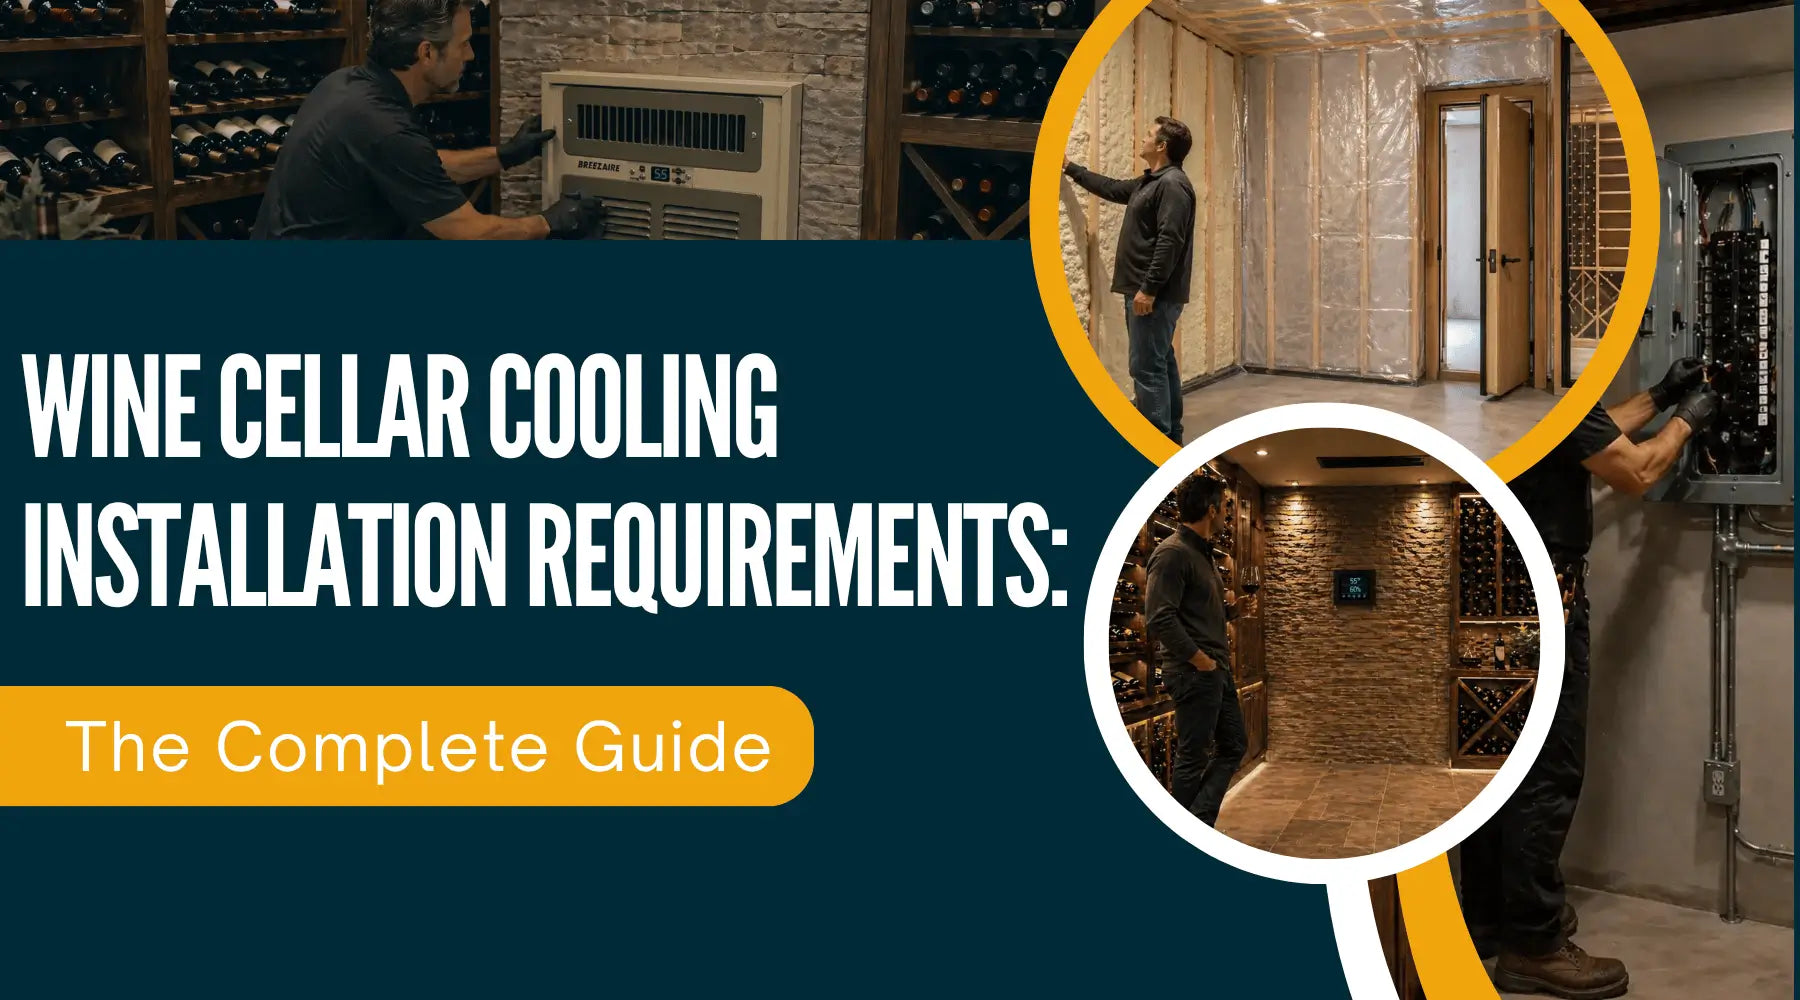
1. Insulation Requirements
Insulation is crucial to prevent temperature fluctuations and reduce the workload on your cooling unit.
- Recommended R-Value: Use insulation rated R13 to R30 or higher, depending on your climate.
- Materials: Closed-cell spray foam is preferred for its superior insulating properties and built-in vapor barrier.
For more on avoiding common pitfalls, see Wine Cellar Cooling Mistakes to Avoid.
2. Vapor Barrier Installation
A vapor barrier prevents warm, moist air from entering the cellar, which can cause condensation and mold.
- Placement: The vapor barrier should be installed on the warm side (outside) of the cellar walls and ceiling.
- Materials: 6-mil polyethylene plastic sheeting is a common choice.
3. Room Construction & Location
- Ideal Location: Choose a spot away from direct sunlight, exterior walls, and heat sources to minimize heat load.
- Space Requirements: Ensure enough clearance for the cooling unit and service access.
- Doors & Glass: Use insulated, exterior-grade doors and double-pane glass to prevent heat transfer.
If you’re considering a glass cellar, check out our glass wine cellar cooling solutions.
4. Heat Load & Airflow
- Heat Load Calculation: Consider room size, insulation, number of bottles, lighting, and adjacent room temperatures.
- Airflow: Ensure unobstructed airflow around the cooling unit for efficient operation.
Cooling System Placement and Setup
Where Should a Wine Cellar Cooling Unit Be Installed?
- Through-the-Wall Units: Install on an interior wall with access to a vented room for exhaust.
- Split & Ducted Systems: Place the evaporator inside the cellar (ceiling or wall-mounted) and the condenser outside or in a well-ventilated area.
- Clearance: Follow manufacturer guidelines for minimum clearance around the unit for airflow and service access.
If you want to compare built-in vs freestanding options, see Built-In vs Freestanding Wine Coolers.
Step-by-Step Installation Overview
- Site Preparation: Frame the room, install insulation and vapor barrier.
- Mounting the Unit: Install mounting brackets and secure the cooling unit or evaporator.
- Running Refrigerant Lines (Split Systems): Route lines between the evaporator and condenser.
- Electrical Setup: Provide a dedicated circuit, install disconnect switches if required by code.
- Drainage: Set up gravity drains or condensate pumps to manage condensation.
- Pressure Testing: Test for leaks and system integrity before operation.
- System Startup: Power on the unit, calibrate controls, and monitor performance.
Professional installation is highly recommended, especially for split and ducted systems.
For a detailed walkthrough, read Installing a Split System Cooling Unit.
Ventilation, Ducting, and Exhaust Requirements
Wine Cellar Ventilation Requirements
- Ventilation: Essential for removing excess heat and maintaining air quality.
- Exhaust: Through-the-wall units must exhaust warm air to a separate, ventilated room.
- Ducting: Use insulated ductwork to prevent condensation and minimize energy loss.
For more on ducting options, see Through-the-Wall vs Ducted Wine Cooling.
Wine Cellar Ducting Requirements
- Material: Use rigid or flexible insulated ducting as specified by the manufacturer.
- Layout: Keep duct runs as short and straight as possible for efficiency.
Electrical and Power Considerations

Wine Cellar Cooling System Electrical Requirements
- Dedicated Circuit: Each cooling unit should have its own circuit to prevent overloads.
- Disconnect Switch: Some local codes require a disconnect switch near the condenser.
- Professional Electrician: Always hire a licensed electrician to ensure code compliance and safety.
If you’re budgeting your project, check Wine Cellar Cooling System Cost.
Drainage and Humidity Control
- Condensation Management: Install a gravity drain or condensate pump to remove water from the evaporator pan.
- Humidity Control: Maintain 50–70% relative humidity for optimal wine preservation. Some systems include built-in humidifiers or dehumidifiers.
To learn more about managing humidity, read Wine Storage Humidity Control.
Professional vs. DIY Installation
Can I Install a Wine Cellar Cooling Unit Myself?
- Self-contained units: Possible for skilled DIYers.
- Split and ducted systems: Require HVAC expertise, refrigerant handling, and electrical work—professional installation is strongly advised.
For maintenance tips, see Wine Cooler Cleaning and Maintenance.
Professional Installation Services
- Ensure compliance with manufacturer requirements and local codes.
- Protect your warranty and investment.
- Avoid common pitfalls that can lead to system failure.
Installation Costs and Requirements
- Costs: Vary based on system type, cellar size, and site conditions. Expect higher costs for split and ducted systems due to complexity.
- Requirements: Adherence to manufacturer specs, building codes, and best practices.
For a comparison of value, read Are Wine Coolers Worth It?.
Maintenance and Ongoing Requirements

- Regular Inspections: Check for leaks, drainage, and proper operation.
- Filter Cleaning/Replacement: Keep air filters clean to maintain airflow.
- Professional Servicing: Annual maintenance by a qualified technician is recommended for optimal performance.
For more on maximizing longevity, see Wine Cooling System Lifespan.
Brand-Specific Installation Requirements
-
WhisperKOOL and Wine Guardian: Always consult the manufacturer’s installation manual for specific clearance, ducting, and electrical requirements.
For trusted performance, explore our WhisperKOOL, Breezaire, and CellarCool collections.
-
Custom or Luxury Installations: Work with a wine cellar specialist to design and install systems tailored to your unique needs.
For a direct brand comparison, see WhisperKOOL vs Breezaire.
Alternative Wine Storage Solutions
If you’re looking for other storage options, check out our wine coolers, built-in wine coolers, or freestanding wine coolers.
For guidance on choosing by size, see Best Wine Coolers by Bottle Capacity and What Size Wine Cooler Do I Need?.
Conclusion

Installing a wine cellar cooling system is a specialized process that requires careful planning, proper materials, and expert installation. By following these wine cellar cooling installation requirements, you’ll create a stable environment for your wine collection and protect your investment for years to come. For best results—and peace of mind—consider working with a professional wine cellar specialist.
Ready to take the next step?
Explore our full range of wine cellar cooling units and brand-specific options to create the perfect storage environment for your collection.